Working with your Library
The asset library provides an almost limitless list of options. Many of these are based on how your company has decided to use the platform in your workstream. For that reason, a basic understanding of the functions available to you in the library may help you work more efficiently.
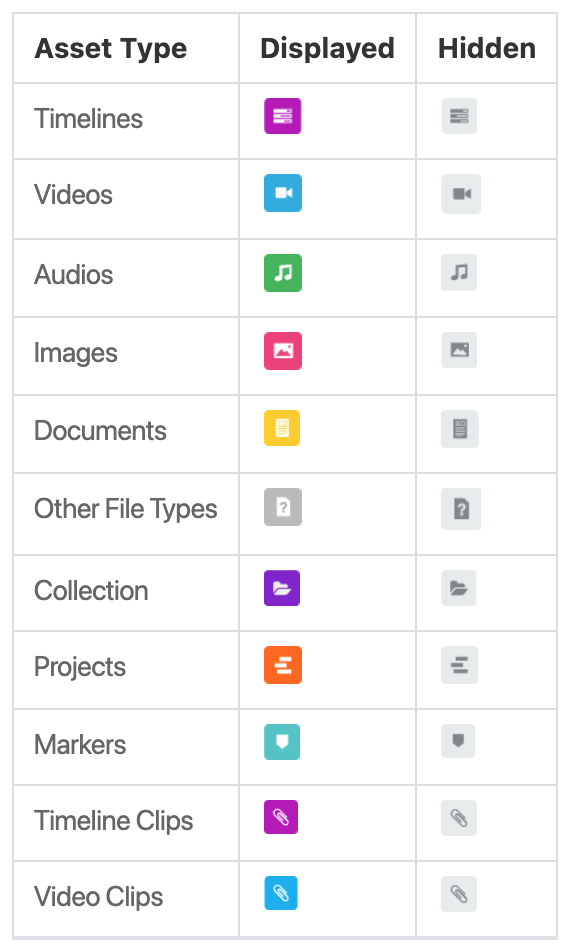
Filter by Asset Type
You can filter the asset grid by asset type by selecting or deselecting the asset type icons.
Your active filters can be viewed by the chips across the top of your content overview panel

Working in Single Asset View
When you double-click an asset from the Dashboard, it opens in the Single Asset (or unified) View. From this view, you can preview your content, edit metadata, or create clips.
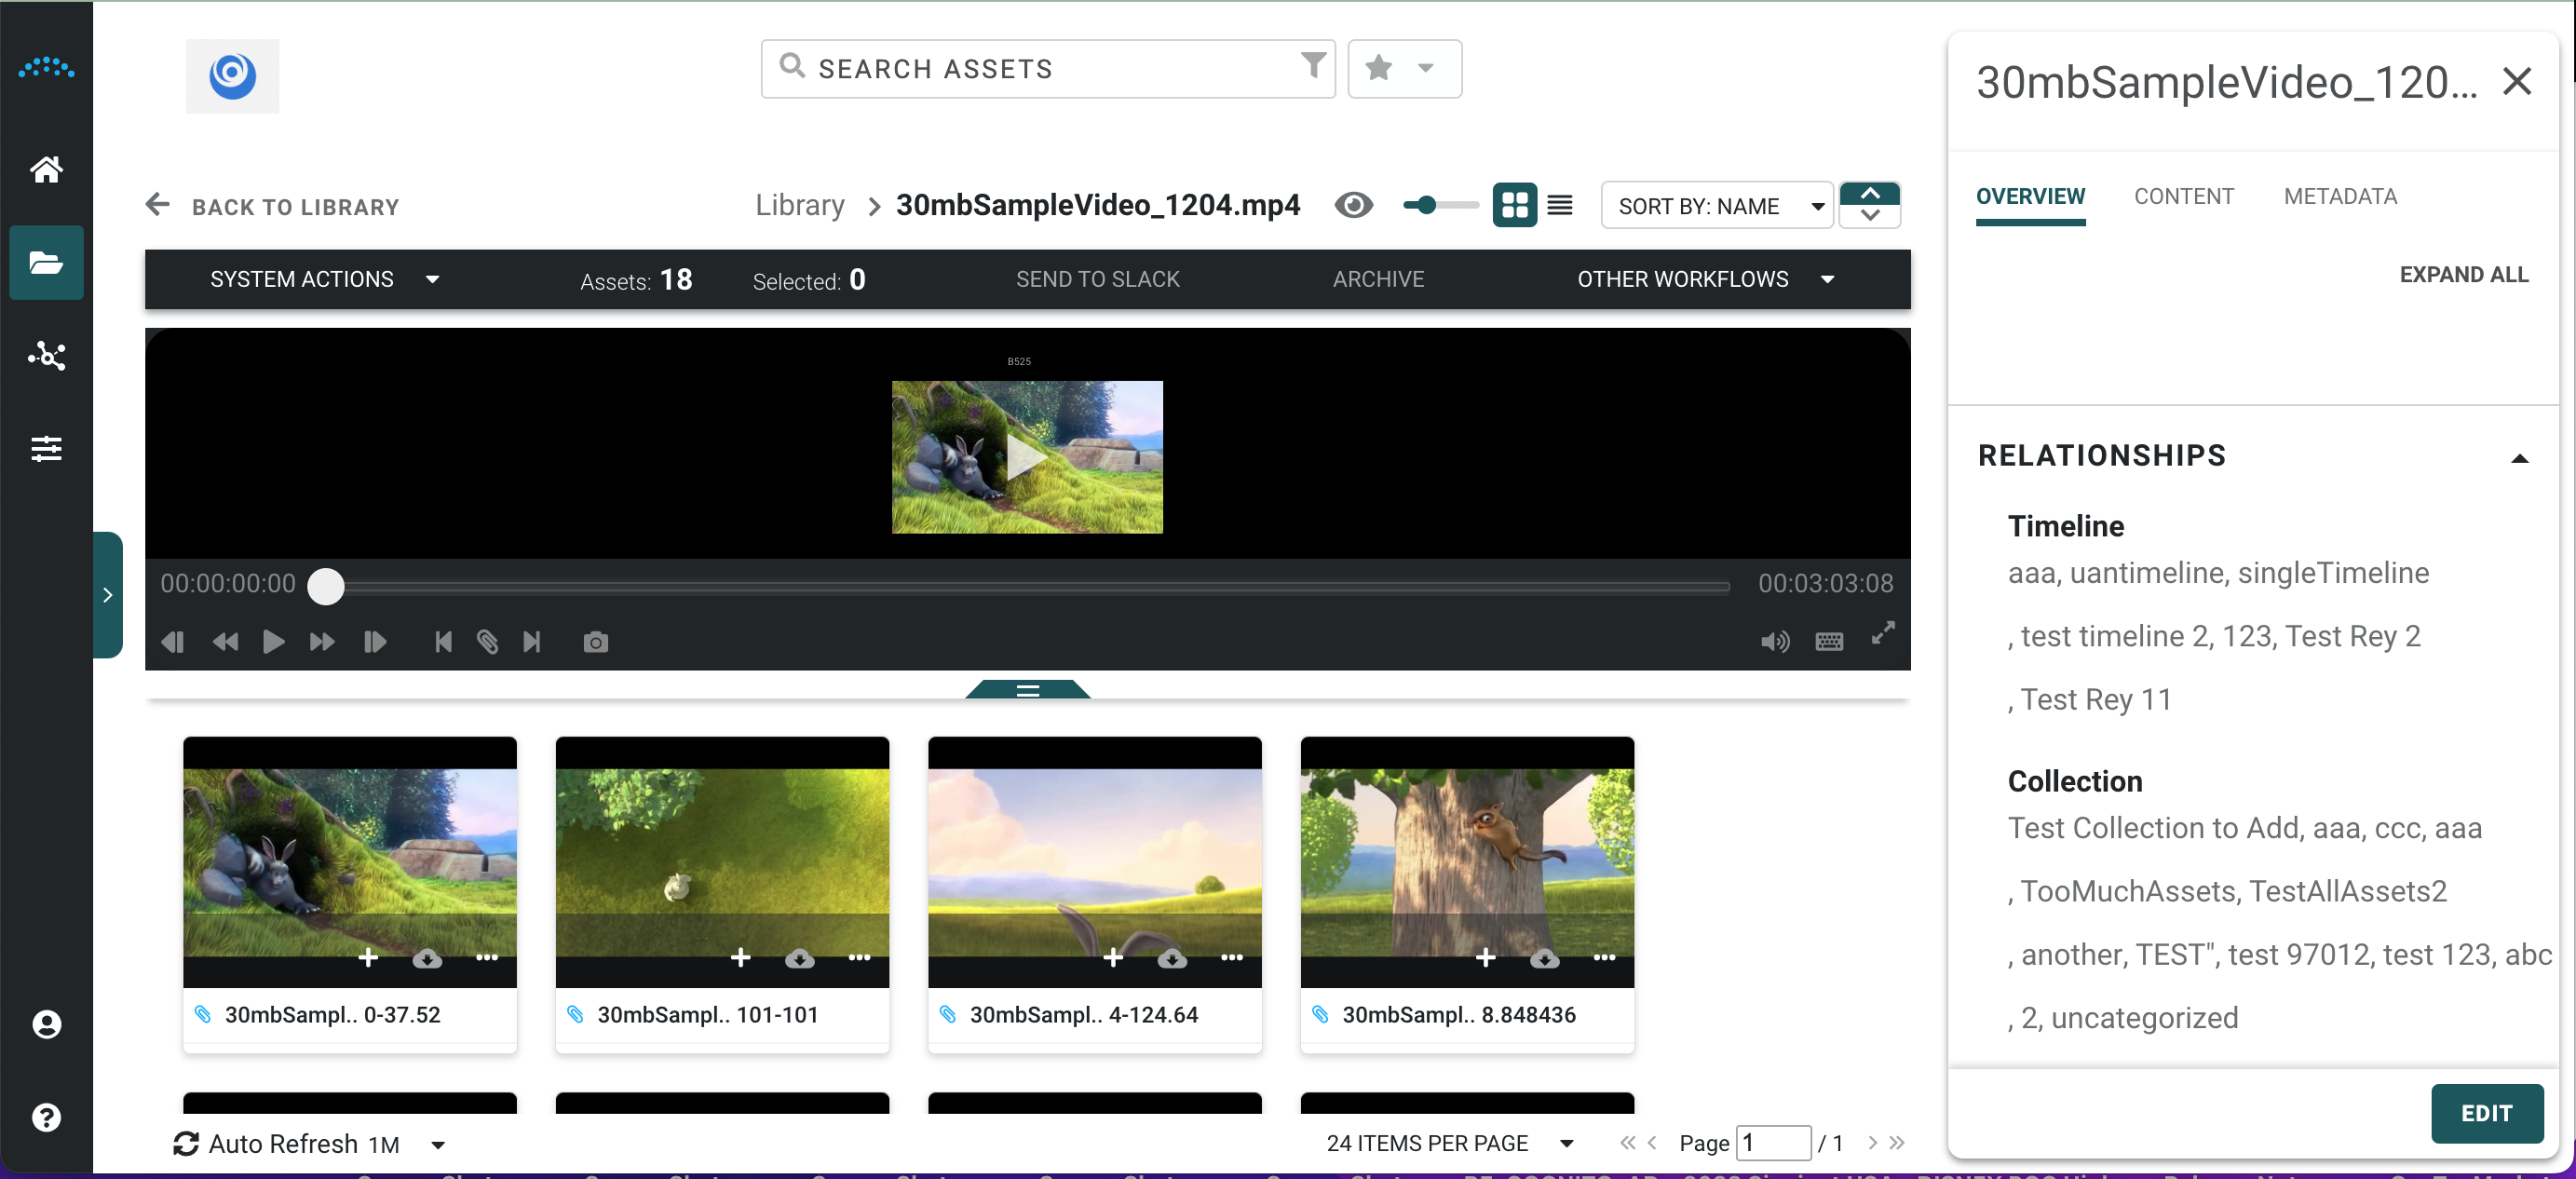
- The center panel displays the asset.
- The left facet and collection panel remain if the asset is a clip, video, or collection.
- The bottom center panel displays for videos and clips. If you open a video, all clips in that video are listed. If you open a clip, the clip is highlighted and all other clips that are part of the main video are listed.
- The right panel displays information about the asset. Some information can be edited by clicking the Edit button in the lower right of the panel.
- For videos, images, documents, and audio, you can preview your content. You cannot preview PSD, AI, or EPS files.
- To change the size of the preview window, drag the bottom tab up or down.
- Expand the left panel to filter the assets using facets.
- Use the video player icons to step backward by frame, rewind, play/pause, fast forward, step forward by frame, mark in point, create a clip, mark out point, and set a thumbnail for a video. Refer to the Keyboard Shortcuts option in the left panel for keyboard video options.
- To view a video or video clip full screen, select the full-screen icon on the far right of the video icon bar. Press the Esc key to exit the full-screen view.
- Video clips indicate the clip's start and end point in relation to the entire video.
- Audio assets allow you to play the audio file.
- A collection displays its individual assets. The actions available are dependent on the asset selected.
- Expand the right panel to view asset details.
- Expand the left panel to filter the assets using facets.
- Drag the bottom tab down or up to increase or decrease the preview area.
- You can also modify the preview size by selecting a percentage from the drop-down menu on the right (e.g., Fit to Screen).
- Users can switch image assets to view proxy or source files.
- To view the preview full screen, select the Full Screen icon in the lower right of the preview area. Press the Esc key to exit the full-screen view.
Working in the Single Asset View
- Select the double arrows to open the right panel to display asset and metadata information.
- Select the + icon to the right of the asset creation date to display actions available to that asset.
- Select the Download icon located to the right of the + icon or in the upper left to download the asset.
- System Action and Other Workflows Menu options specific to the asset are displayed in the upper right.
- Tags have been added to quickly identify the status of some assets. These tags display before the asset name in the list view, in the upper left corner of the tile in the tile view, or in the upper left corner of the window in the single asset view.
- Placeholder assets are identified by the gray map tag.
- Live event assets are identified by the radio tower tag. The video icon for a live event is colored grey when inactive (when the event has not yet started) and becomes the normal asset color once the event begins.
- Private collections are identified by the eye slash tag.
- Locked projects are identified by the padlock tag. Projects have a locked status when they are checked out by another user.
- Archived assets are identified by the storage box tag.
System Action Workflows
The workflows available for an asset depend on the asset type as well as user permissions. The available workflows are listed in the table below. The Available for column identifies the asset types that apply to that action.
| Workflow | Description | Available for |
| Any Asset Ingest | Ingests any file into Reach Engine. | All assets |
| Ingest Asset to Collection | Ingests any file into Reach Engine and saves it to the selected collection. | All assets |
| Any Directory Ingest | Ingests any directory into Reach Engine. | All directories containing assets |
| Ingest Directory to Collection | Ingests any directory of files into Reach Engine and saves it to the selected collection. | All directories containing assets |
| Any Asset Ingest Version | Ingests a file into an asset as a new version instead of creating a new asset. | Video, Image, Document, Audio, Other |
| Any Placeholder Asset Ingest | Ingests a file into an asset that does not have any content yet. | Video, Image, Document, Audio, Other |
| Create Proxies Any Asset | Generates new proxies for the selected asset (create mezzanine, proxy, thumbnail, thumbnail video decided by properties). | Video, Image, Document, Audio, Other |
| Email Image | Send image proxies via email. | Image |
| Export Image | Export images in various sizes. | Image |
Comprehensive List of All System Actions
The actions available for an asset depend on the asset type as well as user permissions. The available actions are listed in the table below. The Available for column identifies the asset types that apply to that action.
| Action | Description | Available for |
| Add to a Collection | Adds the selected asset(s) to a collection. Choose the collection and click Add. | Any |
| Add to Timeline | Add the selected asset to a timeline. | Audio, Document (vtt's only), Image, Video |
| Add to Track | Add selected asset to a track on a timeline. | Video |
| Batch Download | Allows you to download assets. | Any except: Clips, Collections, Projects, Timelines, Marker, Video Clips |
| Batch Update | Allows you to update metadata for multiple files at once. Only available if you have the appropriate permissions. See Batch Updates for more information. | Any |
| Create Collection | Allows you to create a new collection. | None |
| Create Live Event | Specify a live event's server, feed, and start/end time. From this live event asset, you can create clips and upload them to social media. Live events can be ingested as video assets once the live event has been completed. | None |
| Create Timeline | Create an empty timeline (when no assets are selected). | None |
| Delete | If you have the appropriate permission, you can delete assets, collections, or timelines. When deleting a timeline, check the Including source file option next to the Delete button to also delete the source file. | Any |
| Download Mezzanine | Download the mezzanine file to your local machine. Only available if a single asset is selected and if you have the appropriate permissions. | Any except: Clips, Collections, Markers, Timelines |
| Download Proxy | Download a proxy to your local machine. | Any except: Clips, Collections, Markers, Timelines |
| Download Search Results as CSV | Downloads the search results to a CSV file. | None |
| Download Source | Download the source file to your local machine. Only available if a single asset is selected and if you have the appropriate permissions. | Any except: Clips, Collections, Markers, Timelines |
| Edit Live Event | Allows you to edit live event properties. | Only live events |
| Edit Metadata | Allows you to edit metadata. | Any |
| Edit Placeholder Asset | Opens a modal to edit a placeholder asset. | Any Placeholder |
| Export Video | Allows you to select a template and download location for the file. | Video |
| Export Timeline Clip | Allows you to select a template and download location for the file. Includes a check box to include the video asset when exporting. | Timeline clip |
| Export Video Clip | Allows you to select a template and download location for the file. | Video clip |
| Import Project | Import a project from Adobe Premiere, Anywhere, Final Cut Pro, or some other application. | None |
| Manage Checklist Groups | Allows for the adding and removal of asset checklist groups. | Any |
| Move to Another Collection | Moves assets from one collection to another. | Any except Collections |
| Post to Linked Accounts | Submit a clip to a social media account. | Video, Video Clip |
| Project Check In | Allows you to check in a project that you have locked. | Project |
| Project Check Out | Allows anyone with "Modify Projects" permission to check out/lock a project. | Project |
| Remove Asset(s) | Removes the selected assets from the Asset Checklist | Any |
| Remove from This Collection | Removes the selected assets from the focused collection. | Any except Collections |
| Remove from Timeline | Removes the selected assets from the timeline. | Audio, Document (vtt's only), Image, or Video |
| Set as Collection Thumbnail | Sets selected assets thumbnail as the focused collections thumbnail. | Any asset with a thumbnail |
| Set as Timeline Thumbnail | Sets the selected asset as the focused timelines thumbnail. | Image or Video with thumbnail |
| Show Project Versions | Displays the version history of a project for a user who has "Modify Project" permissions. The current, active (master) version is identified by the radio button selection. Select a version and click the Save As Current version button to make the selection the current version. • The column for the version number increments with each new version. • The column for date modified, date/time stamp updates with each new version. • The column for notes is for free-form text to add notes with each new version. | Project |
| Show Versions | Displays the version history of the asset for a user who has "Modify Asset" permission. Any version in the history can be saved as the current version. Notes for each version are system-generated. | Any except projects |
| Snap to Playhead | Moves the selected asset to the current playhead position on the timeline. | Audio, Document (vtt's only), Image, or Video |
| Unlock Project | Allows you to unlock a project that you have locked. Administrators can unlock any project. | Project |
Working with Multiple Assets
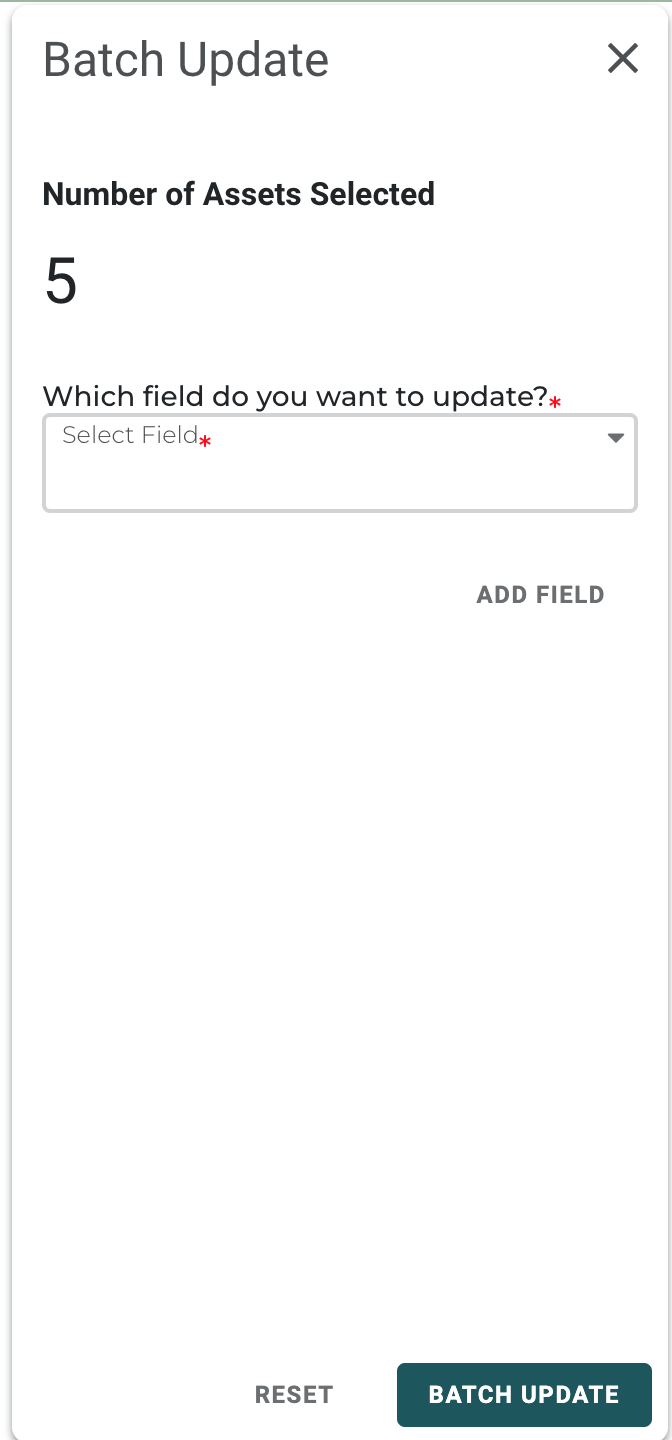
Batch Update lets you make changes to multiple assets at once. You must have appropriate permissions to access this feature.
To use batch update:
- Select one or more assets.
- The right curtain displays the names of the assets selected as well as the types
- The asset information bar also indicates the number of assets in relation to the filter on the library
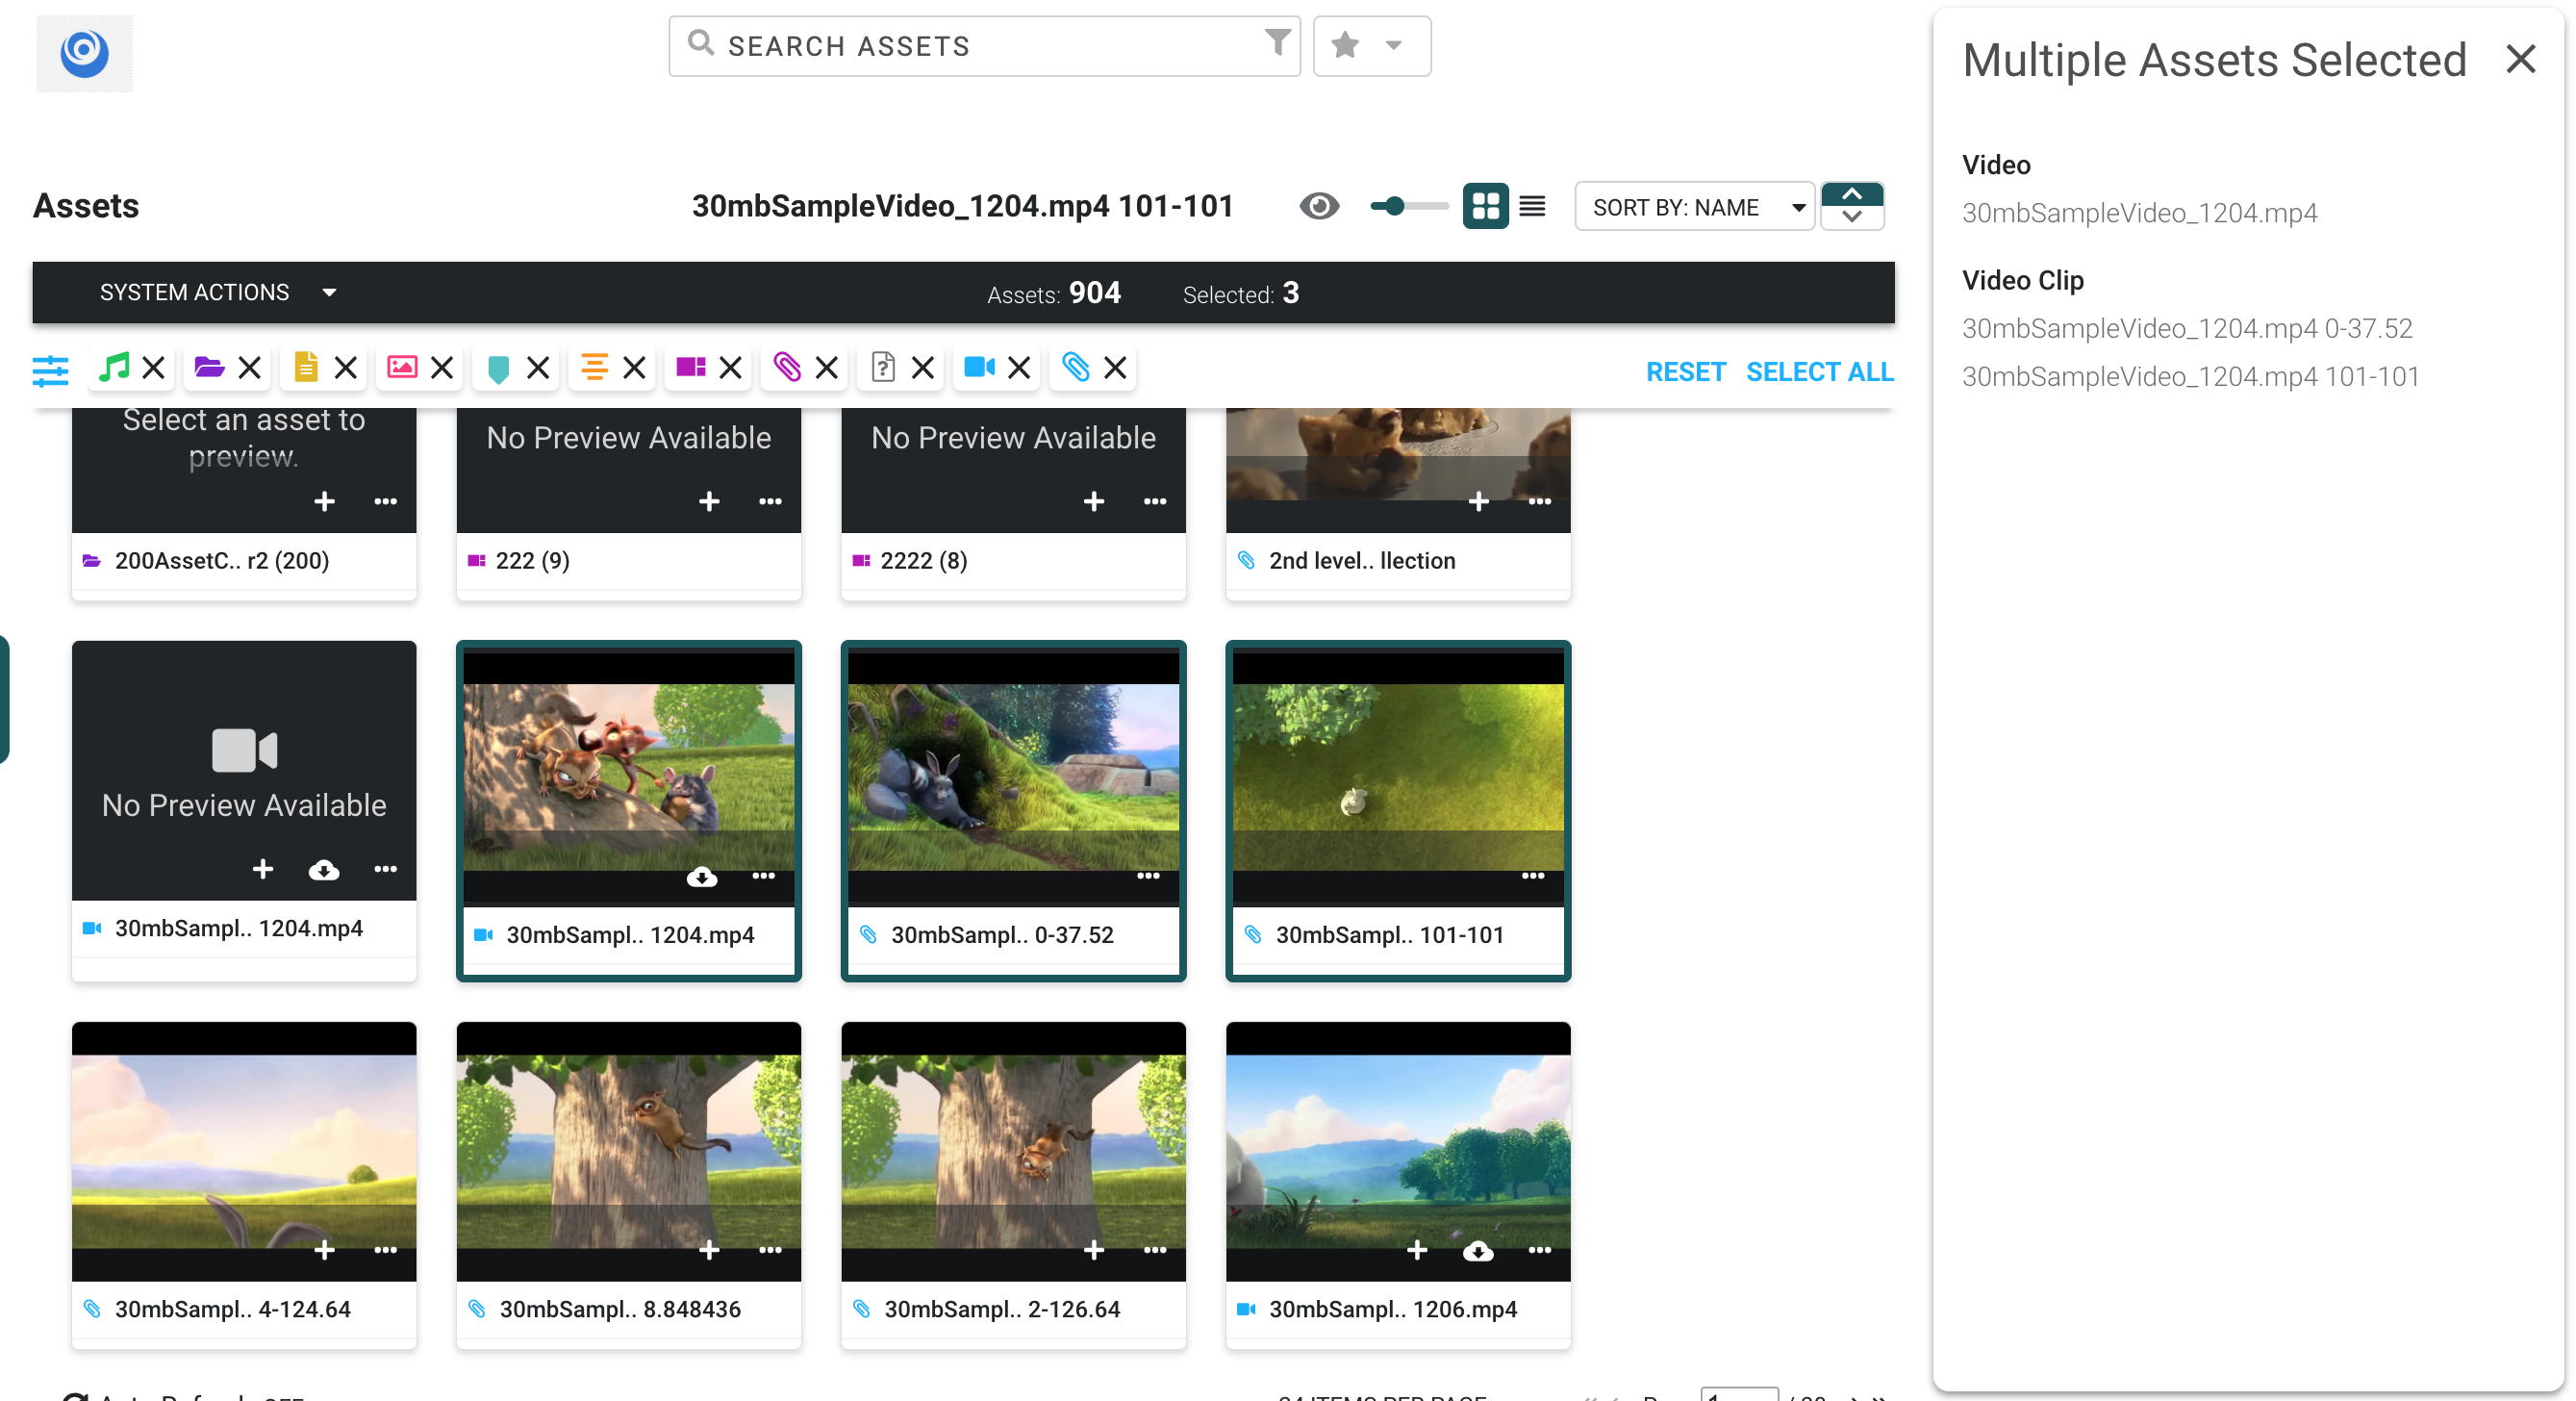
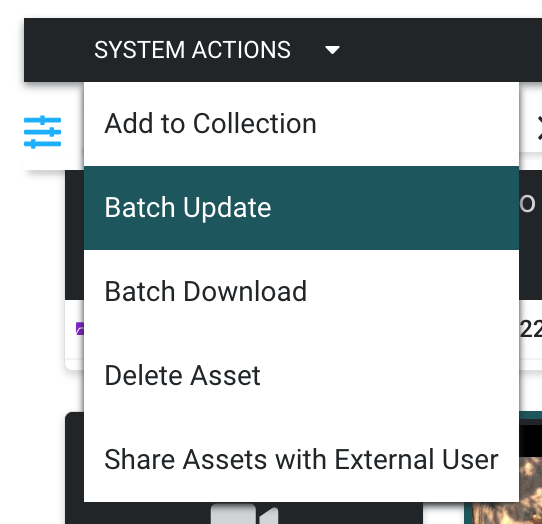
- From the System Actions menu, select Batch Update.
- Select which field you want to update.
- Depending on the field you are updating, you may need to choose what happens to the existing value (replace, append, prepend, remove).
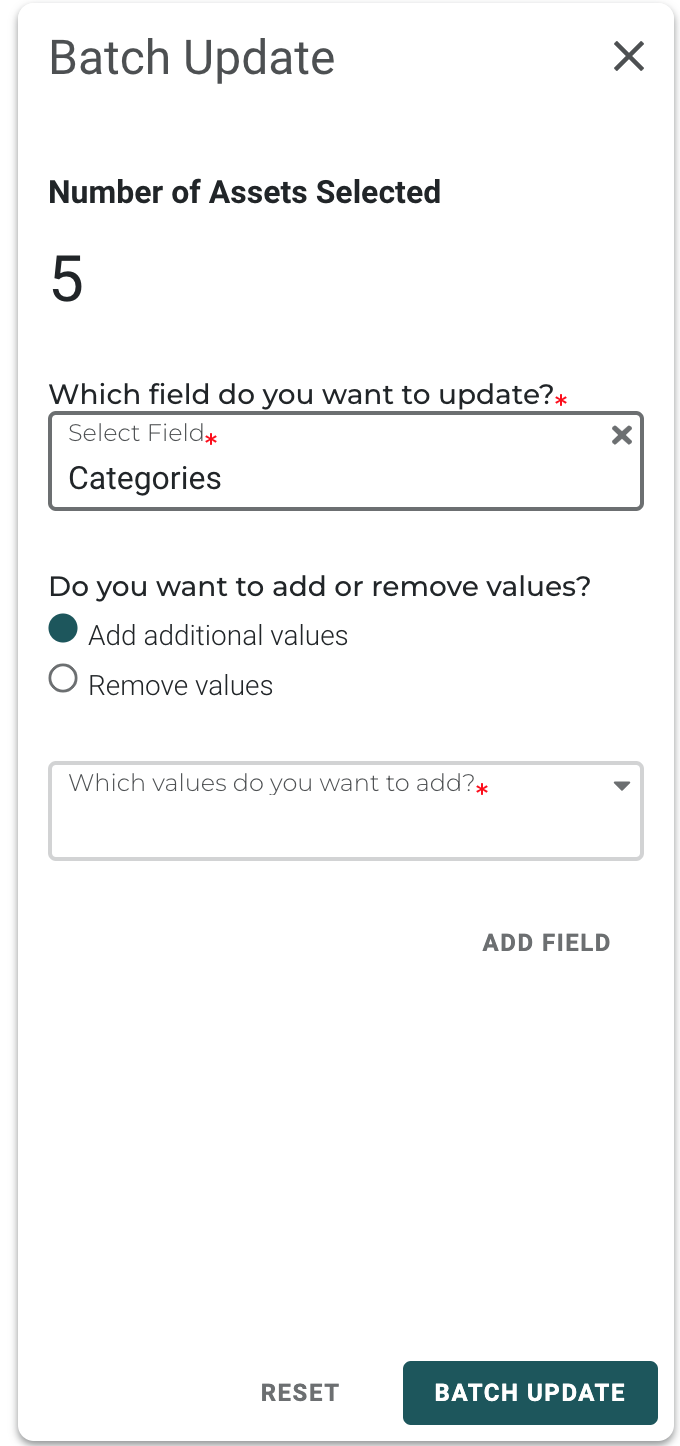
- Enter the new value.

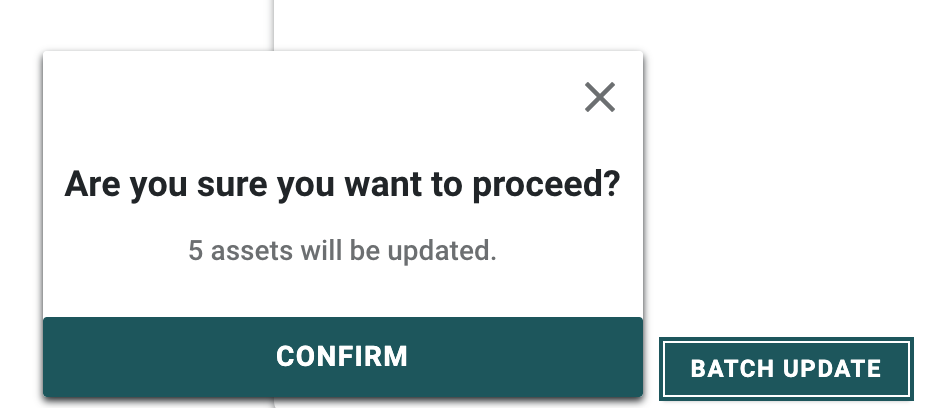
- Select the Batch Update button.
Adding Assets to Your Library
Ingest Directory
To add a directory of assets to Access:
- From the Assets dashboard, click the Workflow Group or More dropdown where this workflow is available and select Any Directory Ingest.
- Select the directory to ingest.
- Optionally, select a Collection for the assets.
- Optionally, select a metadata form to be applied to the ingested assets.
- Click Start.
Ingest One or Multiple Assets
To select a single or multiple files:
- From the Assets dashboard, click the Workflow Group or More dropdown where this workflow is available and select Any Asset Ingest.
- Locate the file(s) to ingest.
- Optionally, select a Collection for the assets.
- Optionally, select a metadata form to be applied to the ingested assets.
- Click Start.