Workflow Step Queues
⛔️ WARNING: The capabilities outlined below are for advanced Reach Engine admins. Updates can have serious consequences for your system as well as your content library. Changes should always be tested on development systems prior to implementation. Please do not attempt modifications if you are unsure of outcome. Contact support for clarification and or further assistance.
Queues can be set up or adjusted to fine-tune how Reach Engine workflows consume resources. In many instances, queues are put in place to limit the number of any given workflow steps to ensure that Reach Engine is stable and executing at its maximum capacity. In this article, we will go over the anatomy of a queue, and how to set up a specific workflow step queue.
The Basics:
To install and view the queue manager, please refer to this article. The queue manager comes with several queues built-in, at Levels Beyond, we have taken to calling these the golden queues. They are:
- copyFileStep
- Set Context Data Step
- Subflow
- Image Conversion
- SaveDataObject
- Catch All Query Step
- HTTP Step Queue
- Transcoding Queue
- default
- Delete File
- Groovy Step
- Delay Step
- RunCommand Step
- Save Asset Step
All of these are stored in /reachengine/tomcat/lib/localContext.xml and the max number of executing workflow steps can be adjusted there.
Whenever a queue is updated or added in localContext.xml, Reach Engine must be restarted for it to take effect
Anatomy of a Queue:
In localContext.xml you can add a bean to the xml and create a queue. Below is a template and an example of what all goes into a queue:
If you need to impose a queue on a specific workflow step that has a golden queue, skip to the next section.
Template:
        <bean id="<<UniqueNameCamalCased>>" parent="baseDataObjectInjector">
                <property name="keyPropertyName" value="name"></property>
                <property name="injectionData">
                        <bean class="com.routeto1.data.spring.DataObjectInjectionData">
                                <property name="dataObjectClassName" value="WorkflowQueue"></property>
                                <property name="runtimeOverrideAllowed" value="false"></property>
                                <property name="injectionData">
                                        <map>
                                                <entry key="name" value="<<Unique Name to Display in Queue Manager>>"/>
                                                <entry key="maxActiveExpression" value="=<<Max Executing at Once>>"/>
                                                <entry key="dynamicPriorityCalculationFlag" value="false"/>
                                                <entry key="stepDataObjectClassName" value="<<WorkflowStepExecutionType>>"/>
                                        </map>
                                </property>
                        </bean>
                </property>
        </bean>
Example:
<bean id="DelayStepQueue" parent="baseDataObjectInjector">
<property name="keyPropertyName" value="name"></property>
<property name="injectionData">
<bean class="com.routeto1.data.spring.DataObjectInjectionData">
<property name="dataObjectClassName" value="WorkflowQueue"></property>
<property name="runtimeOverrideAllowed" value="false"></property>
<property name="injectionData">
<map>
<entry key="name" value="Delay Step Queue"/>
<entry key="maxActiveExpression" value="=100"/>
<entry key="dynamicPriorityCalculationFlag" value="false"/>
<entry key="stepDataObjectClassName" value="DelayStepExecution"/>
</map>
</property>
</bean>
</property>
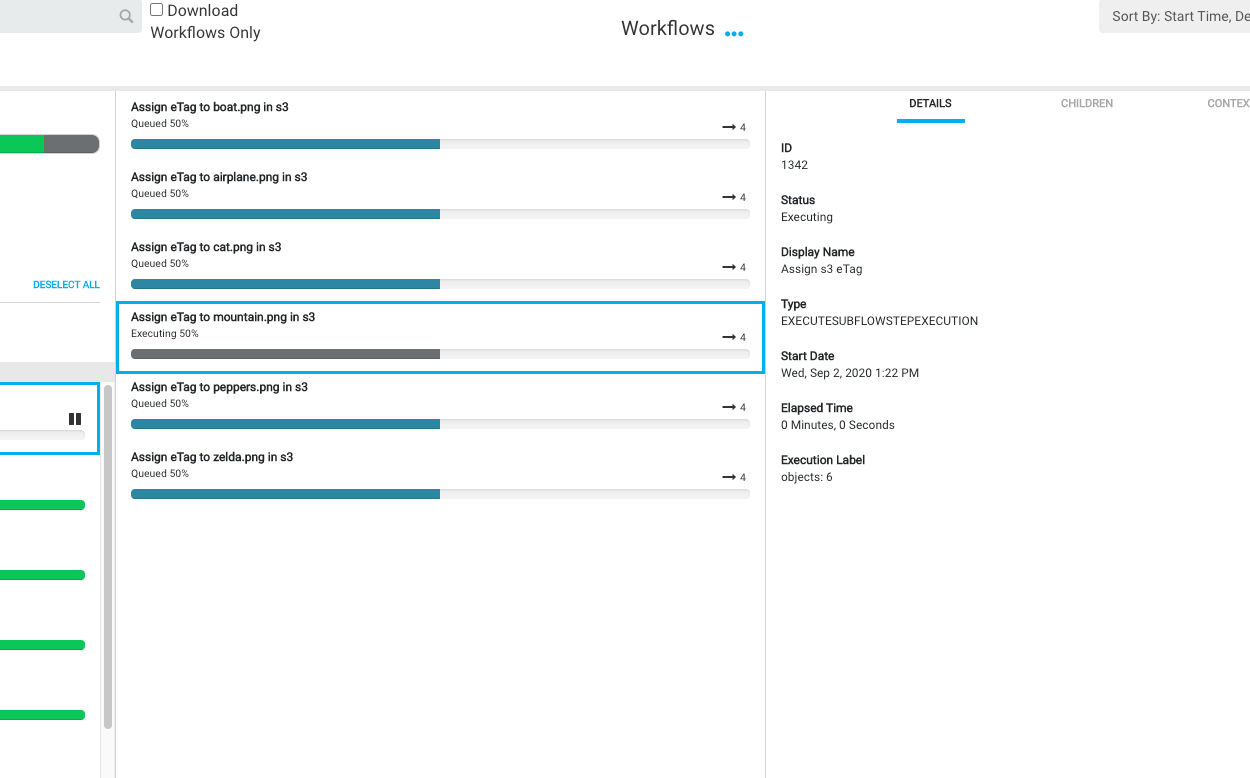
</bean>All of the variables (items in <>) in a queue can be assigned whatever the user desires, as long as the id is camel-cased, ends with ‘Queue’, and is unique (no queues can share the same id, Reach Engine will not start if this happens). And the stepDataObjectClassName is a good value that can be located in the status tab of a workflow. Each step will have its execution type labeled, enter this for the entry key stepDataObjectClassName (<entry key="stepDataObjectClassName" value="<WorkflowStepExecutionType>"/>) camel-cased:
How to Queue a Specific Step
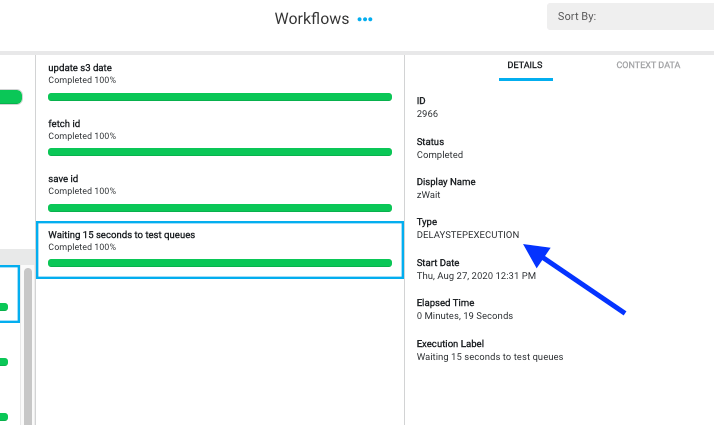
In this example, there is a delay step in a workflow that Reach Engine needs to limit to two at a time. There is already a golden queue, Delay Step Queue, set to a max of 100. We don’t want to adjust the golden queue, so how do we set up a new queue for our delay step.
First, we will grab the name of the workflow step from the workflow or the status tab:
From the workflow we want the name variable:
    <delayStep name="zWait"
  		executionLabelExpression="Waiting 15 seconds to test queues"
  		delaySecondsExpression="15"
  		nestStep="Reindex"
  	>
OR from the status tab we want the Display Name:
In the status tab, we can also grab the stepDataObjectClassName. We now have everything we need to set up our new queue in localContext.xml
First, we will build our workflow step queue, just beneath the Delay Step Queue, filling out the following:
- id - a unique id for our queue - ZwaitDelayStepQueue
- maxActiveExpressions - Max number executing at once, we want to set this to two - =2
- stepExpression - This is a new entry key-value pair where we enter the step name - =name.equals('zWait')
- stepDataObjectClassName - Setting this to the appropriate value from the workflow or status tab - DelayStepExecution
        <bean id="ZwaitDelayStepQueue" parent="baseDataObjectInjector">
                <property name="keyPropertyName" value="name"></property>
                <property name="injectionData">
                        <bean class="com.routeto1.data.spring.DataObjectInjectionData">
                                <property name="dataObjectClassName" value="WorkflowQueue"></property>
                                <property name="runtimeOverrideAllowed" value="false"></property>
                                <property name="injectionData">
                                        <map>
                                                <entry key="name" value="zWait Delay Step Queue"/>
                                                <entry key="maxActiveExpression" value="=2"/>
                                                <entry key="dynamicPriorityCalculationFlag" value="true"/>
                                                <entry key="stepExpression" value="=name.equals('zWait')"/>
                                                <entry key="stepDataObjectClassName" value="DelayStepExecution"/>
                                        </map>
                                </property>
                        </bean>
                </property>
        </bean>
To relate this queue to our step specifically, we have to add the property: <entry key="stepExpression" value="=name.equals('zWait')"/> using our workflow step name.
Now, we need to ensure that the existing Delay Step Queue does not override our new queue. To do this, we are going to add the entry key-value pair for stepExpressions and denote which workflow steps to ignore. We do this by adding the value =!name.equals('zWait')
<bean id="DelayStepQueue" parent="baseDataObjectInjector">
<property name="keyPropertyName" value="name"></property>
<property name="injectionData">
<bean class="com.routeto1.data.spring.DataObjectInjectionData">
<property name="dataObjectClassName" value="WorkflowQueue"></property>
<property name="runtimeOverrideAllowed" value="false"></property>
<property name="injectionData">
<map>
<entry key="name" value="Delay Step Queue"/>
<entry key="maxActiveExpression" value="=100"/>
<entry key="stepExpression" value="=(!name.equals('zWait'))"/>
<entry key="dynamicPriorityCalculationFlag" value="false"/>
<entry key="stepDataObjectClassName" value="DelayStepExecution"/>
</map>
</property>
</bean>
</property>
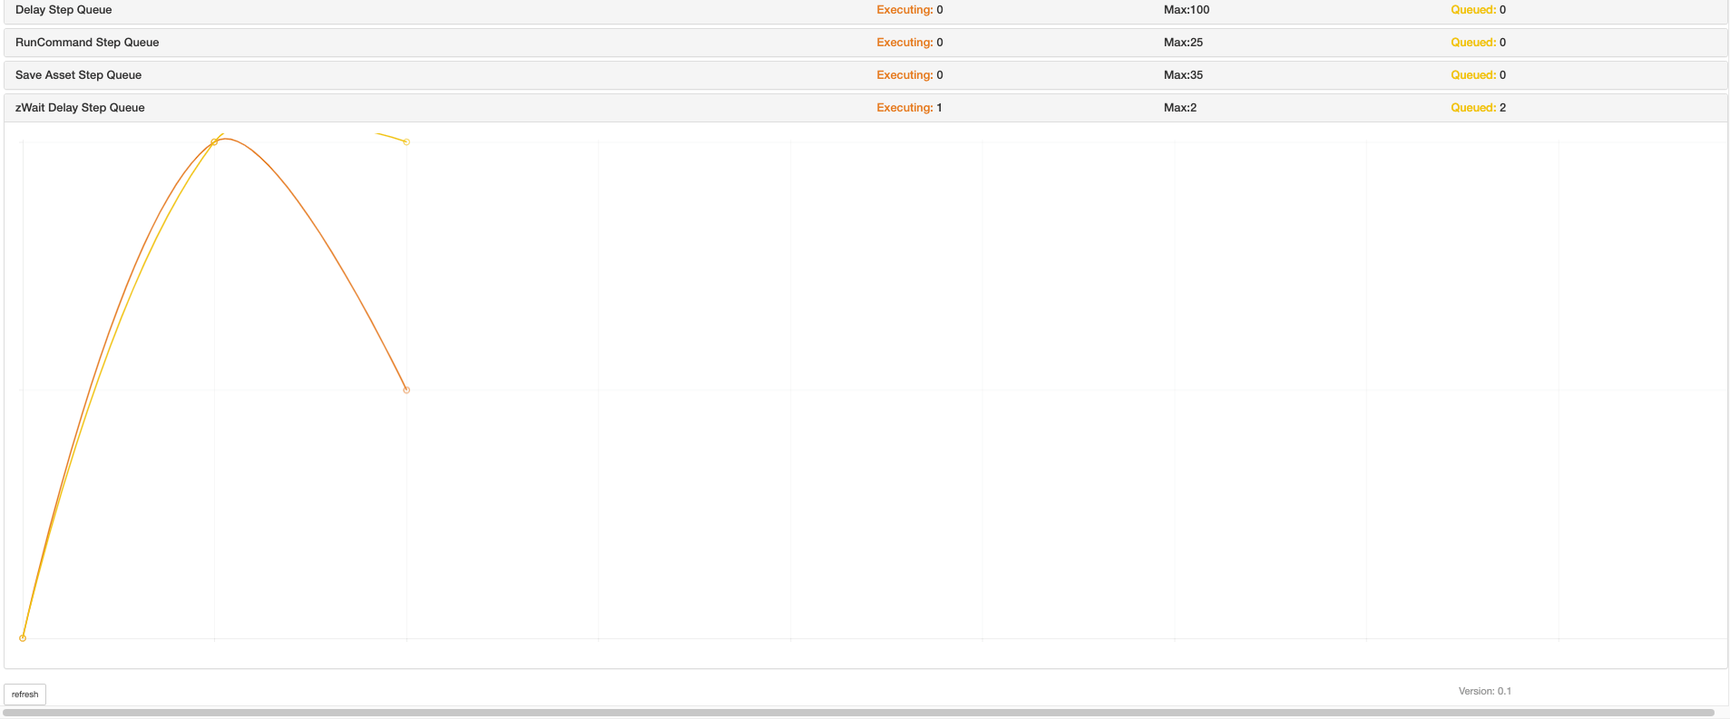
</bean>After these changes are in place, we need to update the queue manager by running the script modqueuemgr.sh -x with the -x flag located in /reachengine/cmds and restarting Reach Engine. The -x flag will have the script override the current installation updating it with our new queue and adjustments.
⚠️ When Queues are updated, and modqueuemgr.sh -x is run, the queues will not update in the /queue-manager/app until a workflow step hits the queue. To check if queues are updated, can connect to the DB and query to make sure they are there.
SELECT * FROM workflow_queue;
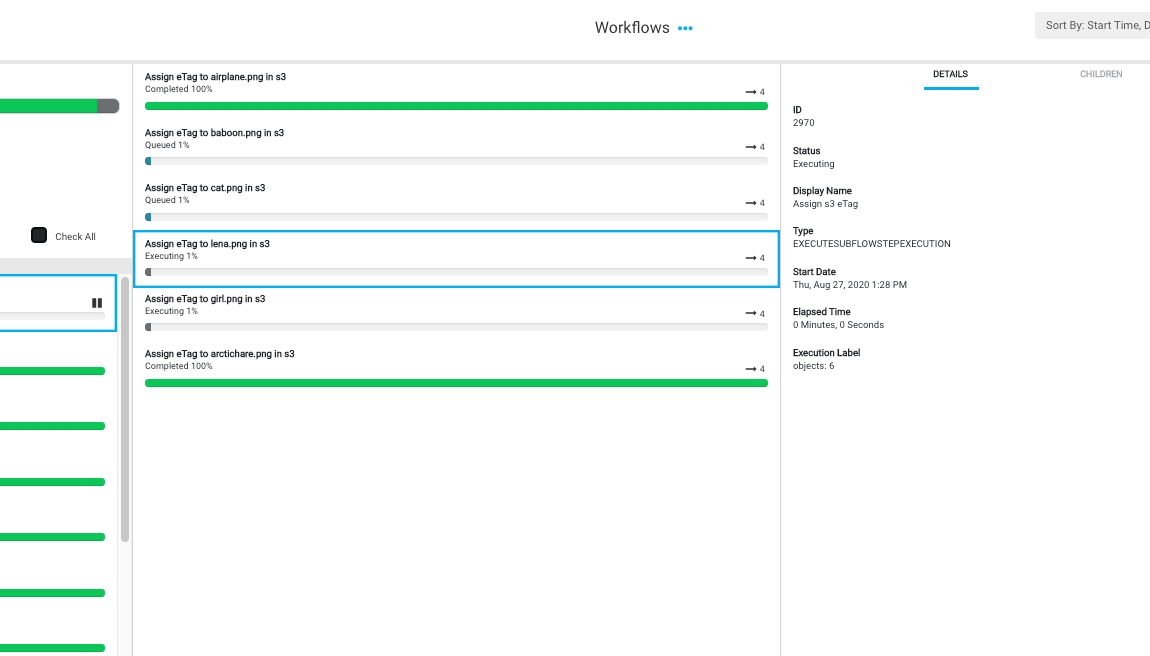
Now we can see the queue in action:
Queues in the Database
It’s also possible to review all current queue’s in the workflow_queue table in the Postgres Database. Here you can see all the properties for the ‘zWait Delay Step Queue’ we just implemented:
studio=> select * from workflow_queue where name ilike 'zwait%';
-[ RECORD 1 ]---------------------+-------------------------------------
date_created                      | 2020-08-27 12:26:18.662-06
date_updated                      | 2020-08-27 12:26:18.662-06
dynamic_priority_calculation_flag | t
max_active_expression             | =2
max_execution_seconds             | 0
name                              | zWait Delay Step Queue
parent_can_block_queue            |
priority_expression               |
show_in_user_interface_flag       | t
step_criteria                     |
step_data_object_class_name       | DelayStepExecution
step_expression                   | =name.equals('zWait')
subject_criteria                  |
subject_data_object_class_name    |
unbounded                         |
uuid                              | a9d26cb2-503b-40d1-bc71-470c7dda9683
id                                | 320
Multiple options can be selected.
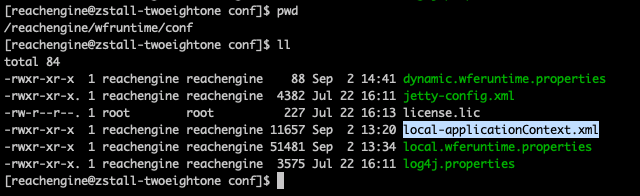
Workflow Step Queue needs to be configured on the Workflow Runtime Node, either in the local-applicationContext.xml, or, if a separate file named queueContext.xml is imported into this local-applicationContext.xml, the updates should be made in this file instead. Both should be located in /reachengine/wfruntime/conf directory.
- *It was discovered that the
queueContext.xmlfile at both the Application node and Workflow Runtime node need to be updated and kept in parity to ensure workflow queues are maintained appropriately. Running a test with different values in each file shows that the application respects whicheverqueueContext.xmland corresponding node has been restarted most recently will be what is read in.
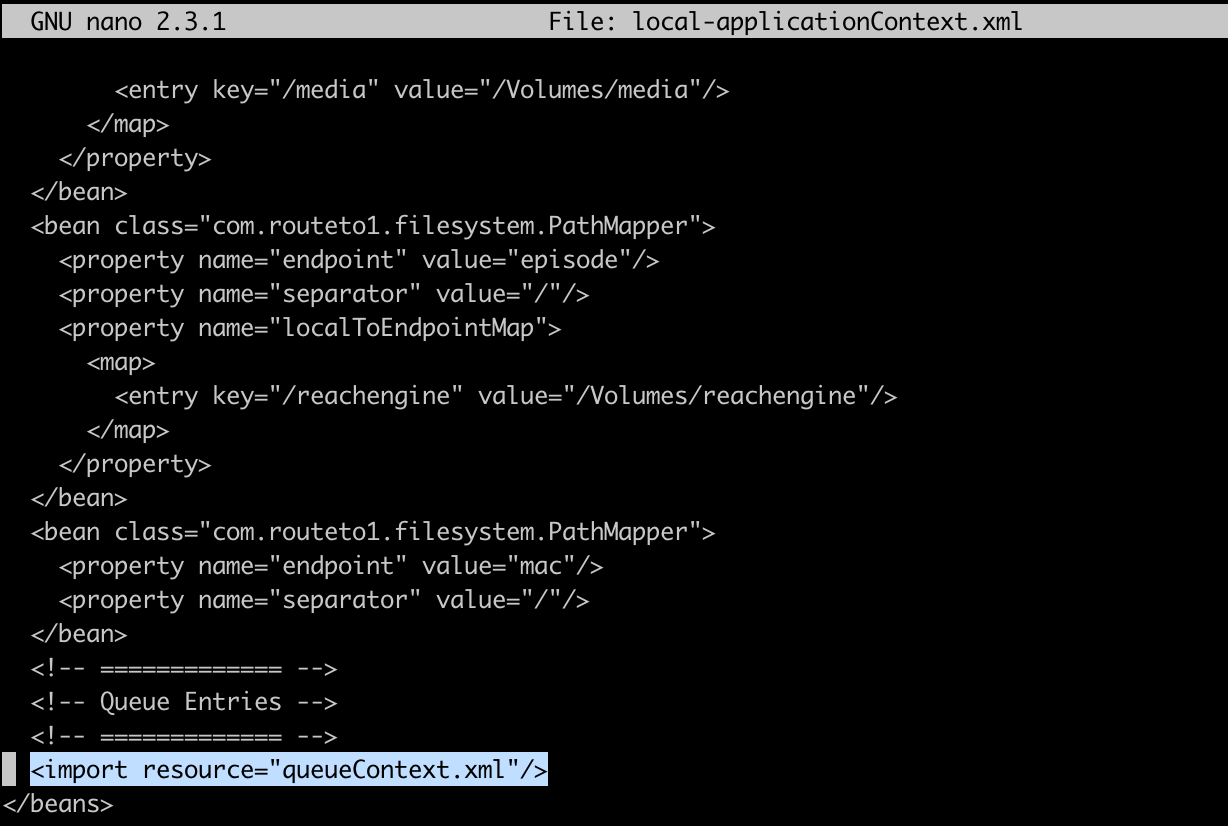
Here is an example of a local-applicationContext.xml where the queueContext.xml contains all the queue Beans:
Here is an example of a delay step queue, specifically targeting a delay step called zWait:
        <bean id="ZwaitDelayStepQueue" parent="baseDataObjectInjector">
                <property name="keyPropertyName" value="name"></property>
                <property name="injectionData">
                        <bean class="com.routeto1.data.spring.DataObjectInjectionData">
                                <property name="dataObjectClassName" value="WorkflowQueue"></property>
                                <property name="runtimeOverrideAllowed" value="false"></property>
                                <property name="injectionData">
                                        <map>
                                                <entry key="name" value="zWait Delay Step Queue"/>
                                                <entry key="maxActiveExpression" value="=1"/>
                                                <entry key="dynamicPriorityCalculationFlag" value="true"/>
                                                <entry key="stepExpression" value="=name.equals('zWait')"/>
                                                <entry key="stepDataObjectClassName" value="DelayStepExecution"/>
                                        </map>
                                </property>
                        </bean>
                </property>
        </bean>
And we’ll have to exclude this custom delay step from the delay step queue:
<bean id="DelayStepQueue" parent="baseDataObjectInjector">
<property name="keyPropertyName" value="name"></property>
<property name="injectionData">
<bean class="com.routeto1.data.spring.DataObjectInjectionData">
<property name="dataObjectClassName" value="WorkflowQueue"></property>
<property name="runtimeOverrideAllowed" value="false"></property>
<property name="injectionData">
<map>
<entry key="name" value="Delay Step Queue"/>
<entry key="maxActiveExpression" value="=100"/>
<entry key="dynamicPriorityCalculationFlag" value="false"/>
<entry key="stepExpression" value="=(!name.equals('zWait'))"/>
<entry key="stepDataObjectClassName" value="DelayStepExecution"/>
</map>
</property>
</bean>
</property>
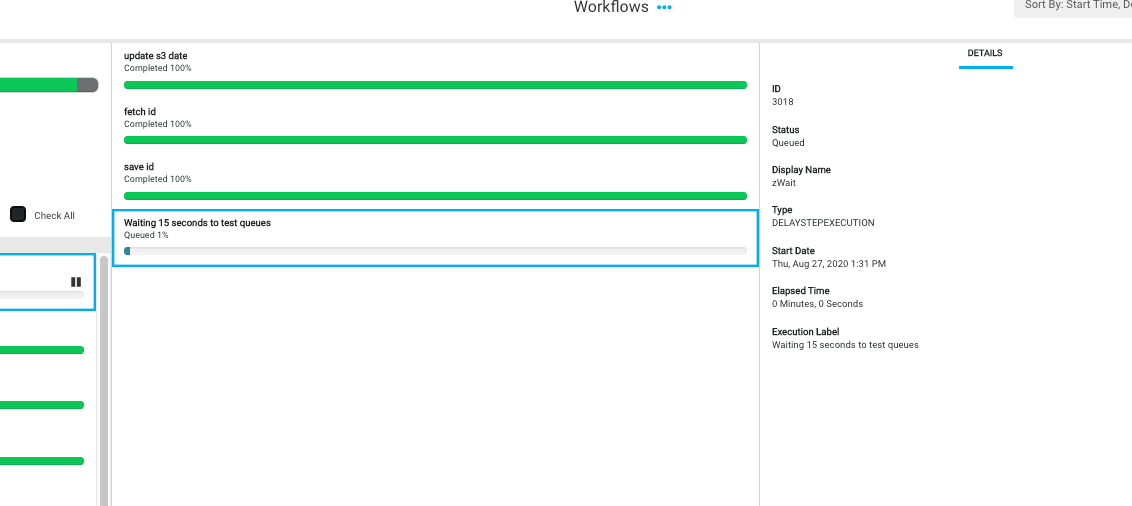
</bean>Once you have the properties in place, restart the workflow runtime node only (Reach Engine app can stay up)!
Now we can see the zWait step is only allowed to execute one at a time: